
How to Fix Too Much Lime on Your Lawn.
What can happen if you put too much lime on a lawn?
If you add too much lime to your lawn it could cause the following issues.
Soil Alkalinity: The main reason we add lime is to raise the soil PH because we want to make it more alkaline. Many plants prefer mild acidity to neutral pH. Too much lime can upset that balance
Nutrient Imbalance: This is a balancing act. While lime will help with the availability of nutrients such as calcium, it will reduce the availability of nutrients like iron, zinc, and manganese
Impact on Microbial Activity: These are what help with things like the decomposition of organic matter in the soil.
Poor Plant Growth: Your plants will appear unhealthy and may have stunted growth.
Increased Salinity: This is the elevation of salt levels in the soil.
Environmental Impact: Depending on the location of the lawn and how close it is to creeks or streams the runoff may affect aquatic ecosystems.
Runoff from areas with excess lime can impact nearby water bodies. This runoff may contribute to water alkalinity and affect aquatic ecosystems.
Importance of addressing the issue:
It is important to test the soil and adjust the line to keep it with the recommended guidelines to keep your lawn in pristine condition. By addressing the issue early you can promote optimal grass growth and have a healthy lush lawn.
Identifying the Problem
The first thing that you need to do is to make sure that you identify the problem correctly. There are more the one thing that may cause these symptoms.
Signs of too much lime
The first step is a visual inspection. Check for yellowing in the grass blades (chlorosis) on new growth. Does the soil look chalky and white? Look for stunted growth another symptom that is a bit harder to check is a decrease in the amount of earthworms. If so then it is time to test the pH levels.
Testing soil pH levels:
Testing the pH level on your lawn is not overly difficult. This step-by-step guide should help you through the process.
What you will need.
- Soil pH testing kit (available at garden centers or online)
- A Shovel or Trowel
- A bucket (plastic)
- Distilled water
- Containers or bags for soil samples
How to run the tests
- Choose Areas to Test.
- The idea is to test several different areas that represent different zones or conditions. There could be areas with different shading, soil, and locations.
- Gather Soil Samples:
- Collect some soil samples using a shovel or trowel. Make sure that you sample from the area when the roots are most active (around 4 to 6 inches)
- Do not collect any samples from areas where you have recently used fertilizer or with debris or thatch. This could skew the results.
- Mix Samples:
- Here is where you get to use your bucket. Mix the sample up until it is a paste. Remove any foreign objects such as stones, roots, or rubbish.
- Get the Soil Ready for Testing:
- Air-dry the soil until it is in a crumbly dry state before testing.
- Don’t try to speed up the process by using a heat gun, hairdryer, etc. This could change the characteristics of the soil.
- Follow the Instructions on the Testing Kit:
- I shouldn’t even have to say this but read the instructions. Different kits may have slightly different procedures.
- Get a Sample Ready For Testing.
- Take the amount of crumbly soil stated on the test kit.
- Run the Test:
- You will probably be asked to add a reactive solution or insert a test strip into the soil.
- Your test kit will tell you what to do next. You may be asked to add distilled water and shake it, or simply wait for a specific period.
- Look at the Results:
- After waiting until the specific period is up have a look at the test strip or solution. What color is it?
- Compare the sample color against the color on your chart that came with the test kit. You will now have a reading for the pH of the soil.
- Run the Test Again
- For the sake of accuracy, do the test a few more times and average the results. For more accurate results, it’s advisable to conduct multiple tests and average the readings.
- Make a note of the pH Level
- Write down the levels in the different areas for future records.
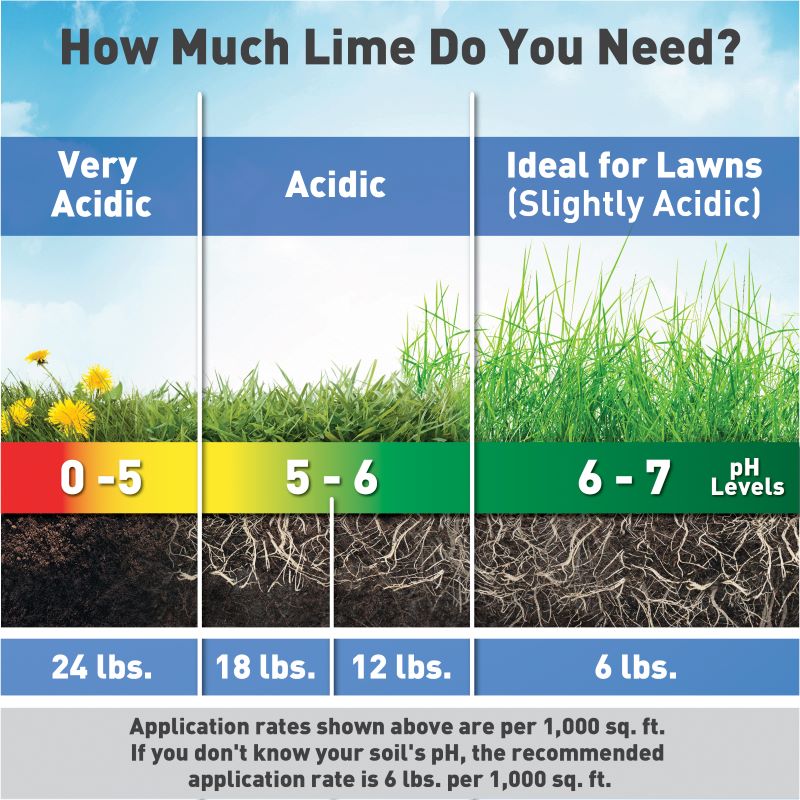
- The ideal pH levels in the soil in most lawns are around in the slightly acidic to neutral pH range of 6.0 to 7.0
Lawnmowing101 Membership
Build a six-figure lawn care business
Lawn Care Software

Get Your Lawn Care Business Running Smoothly
Easier for you and your customers. Jobber helps you quote, schedule, invoice, and get paid—all in one place.
How to Remove Excess Lime
Now that you have established that the amount of lime was the issue it is now time to fix it. These are some commonly used methods to remove excess lime.
Watering your lawn:
The object of the exercise here is to leach the lime out of the soil using water. Here is a step-by-step guide on how to do that.
What you will need.
- Garden hose or sprinkler system
- Water source
Procedure:
- Watering Plan:
- The best time to do this is when your lawn is not under any kind of stress. By stress I mean during a drought or overly hot days. Also, do not do this if you are expecting rain as you want to be in control of how much water is going onto the lawn.
- Get the Lawn Ready
- Mow the lawn before you do this. Cut it short but don’t overdo it. Short grass allows for better penetration of water.
- How to Water the Lawn.
- Make sure the hose or sprinkler system water evenly disturbs the water in the targeted areas. Aim to get the water to penetrate to a depth of at least 6 inches.
- Don’t Rush go Slow & Steady
- You want to soak the ground slowly over time. Do not flood the lawn.
- Keep an Eye on Water Absorption:
- Watch the pace of absorption. If the lawn starts to flood or you get runoff then you will need to pause for a while. Let the excess water absorb before continuing.
- If Needed, Do it Again
- If the excess lime in the soil is severe, you may need to repeat the process. You could do this over a series of days or weeks. The slow approach works best and is less stressful on the lawn.
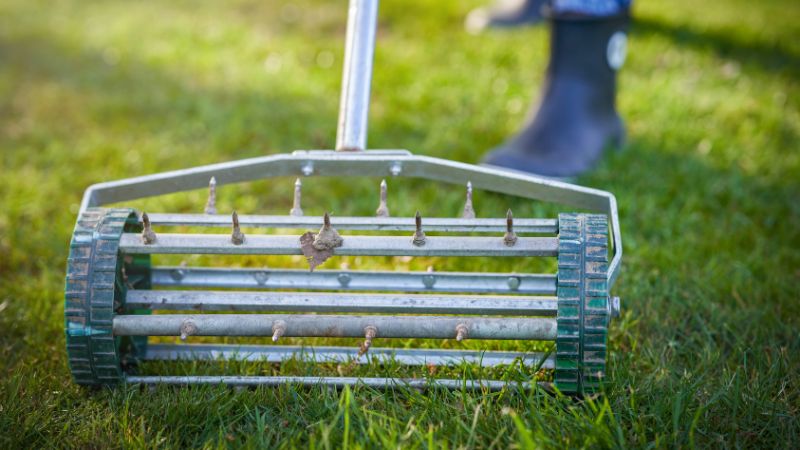
Aeration
Aeration is good for your lawn. By removing perforating the soil with holes to alleviate compaction you can increase oxygen and improve the health of the soil.
What you will need.
- Lawn aerator (manual or mechanical)
- Water source
- Organic matter (compost or well-rotted manure) – optional
- Grass seed – optional
What to do
- Choose the Right Time:
- You want to do this during the growing season so your grass will recover quicker this will depend on the type of grass you have on your lawn. If you have cool-season grass then early fall or spring is best. For those of you in the warm-season grass locations then late spring to early summer is best for you.
- Mow the Lawn:
- Mow the lawn beforehand. Don’t scalp it but mow it a bit on the lower side. You want room for the aerator to penetrate effectively.
- Water the Lawn if Needed:
- You want the soil to be moist, if your lawn is too dry then give it some water one to two days before aerating.
- Choose the Aeration you will use:
- If your area is smaller then a manual aerator should be fine. If your lawn is larger then you may have to rent a petrol aerator. You should be able to rent one of these machines from your local hire shop.
- How to Aerate the Lawn:
- One common method to aerate a lawn effectively is, by making passes in two directions forming a cross pattern. This technique helps address soil compaction. For instance, if you begin by moving from north to south during your pass the next pass should be from east to west creating a grid pattern on the lawn. This approach ensures that the aerator penetrates the soil at angles resulting in a network of holes that facilitate improved air, water, and nutrient movement, within the soil. Ensure that the aerator penetrates the soil to a depth of at least 2-3 inches.
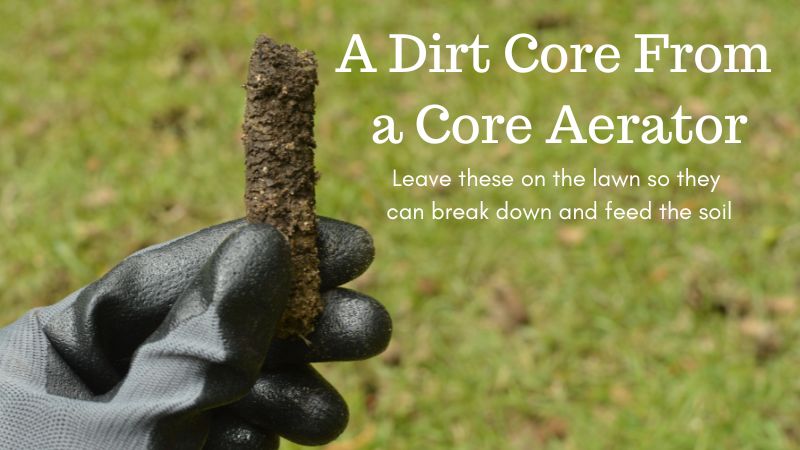
- Core Removal:
- There are two different kinds of and I prefer using ones that take out cores. This is the same concept as an old-fashioned apple core remover. Core aerators are better as they don’t compress to the soil as a spiked aerator would. If you are using a core aerator then leave the core on the soil. They will break down and provide nutrients.
- Water When Done.
- This will help speed up the breakdown of organic matter. Make sure the lawn does not dry out while it recovers.
Adding organic matter:
You can give a lawn a light dusting of compost at this point to stimulate growth and help balance the pH levels of the soil.
Preventing Future Issues
If you want a healthy lawn, you need to treat it right. These are some simple steps to help you get the best lawn on your street.
Proper fertilization:
The key to not overdoing it when adding lime to a lawn is to have an understanding of the right balance of nutrients that works best for your lawn.
This won’t happen instantly but over time you will learn how to apply lime and fertilizer in the right mix for your lawn.
Regular soil testing
You need to test the soil periodically to make sure the pH levels are correct. Consistency is key. For an established lawn, you may only want to check them every two to three years. However, there are a few other times when it would pay to run a test.
One is if you notice a yellowing of the lawn or are having issues with the grass. Another time to check would be after fertilization, just to make sure that everything is correct.
Finally, if you have any major weather events such as major rainfalls or drought it would be a good idea to test the lawn.
Choosing the right grass species:
The final consideration is the kind of grass that you have on your lawn. Make sure that you have a grass type that suits the environment you live in. If you have an unsuitable grass species then it could be an uphill battle all the way.
Listen to audiobooks while you work.

With a sixty-day free trial
Discover millions of ebooks, audiobooks, and so much more for just $9.99/month.
Conclusion: How to Fix Too Much Lime on Your Lawn
To keep your lawn healthy and vibrant it’s important to be precise when applying lime. Using much can cause alkalinity reduce activity, hinder growth, and increase salt levels. It’s crucial to stay vigilant and recognize signs of lime while regularly testing the pH levels.
To prevent issues follow fertilizing techniques and choose suitable grass species, for your area. Occasionally you may need to take measures like leaching or aerating strategically to maintain the well-being of your lawn. Now is the perfect time to create a maintenance schedule, for your lawn so that it can thrive in conditions.
Soon enough you’ll have the green oasis you’ve always wanted.
Get tips & tricks on how to grow a profitable lawn care business delivered to you inbox every week.


Leave a Reply